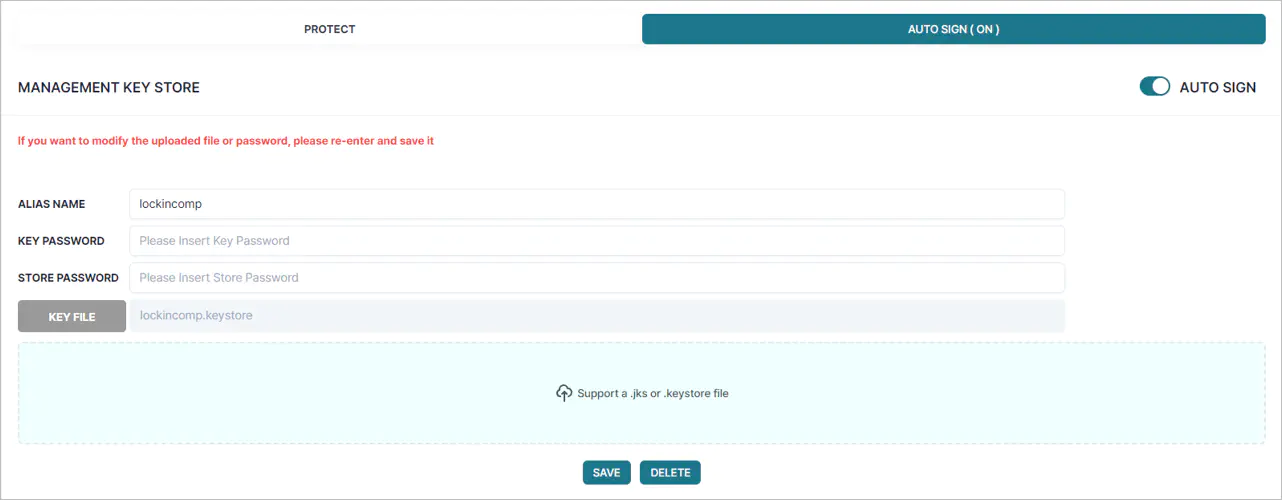
AUTO SIGN
This is the settings page for automatic re-signing after applying LIAPP.
You can check the AUTO SIGN tab located on the right side of the PROTECT page.
To use AUTO SIGN, please follow the steps below:
Upload Key file (.jks or .keystore)
Enter ALIAS NAME, Key Password, Keystore Password
Click button
Enable AUTO SIGN switch
Upload the Key file

Register the key file you want to use.
Before registering the key file, ensure that the APP is selected.
If you select an app after registering it or refresh the page, you’ll need to register the key file again.
- Click the button to upload the file.
- Drag and drop files directly onto the [Support a .jks or .keystore file] section.
ALIAS NAME, KEY PASSWORD, STORE PASSWORD

Enter the necessary information for each item required for APP SIGNING.
❗ If the entered information is incorrect, AUTO SIGN FAILED may occur after applying LIAPP.
❗ Please be careful when entering information, especially for passwords, as they are not displayed.
SAVE / DELETE
Save the entered information.
Saved information is retained until deletion, eliminating the need to set it up again for every PROTECT.
If there are changes in information, such as key files or passwords, you can re-enter and save the updated details.
Delete the saved information.
If you no longer wish to use the AUTO SIGN, you can delete it.
AUTO SIGN Setting
The automatic signing setting is for the AUTO SIGN feature.
You can change the options by clicking SWITCH.
| Option | Description | |
|---|---|---|
| OFF | AUTO SIGN feature will not be applied. The status displayed in the top tab is indicated as OFF, as shown. | |
| ON | AUTO SIGN feature will be applied. The status displayed in the top tab is indicated as ON, as shown. |